Do you want to know How to Pass Multiple Parameters in onClick Function in JavaScript?
If you’re building a website and need to pass multiple parameters when a user clicks a button, you can follow these simple methods explained in this blog post.
AD
There are multiple ways to pass more than one parameter, but if you’re looking for an easy and simple method that even a newbie can understand and review in the future, follow the steps I’ve explained today.
Use Cases of Passing Multiple Parameters in onClick Functions
1. Handling Dynamic Data in Lists
A common use case is iterating over a list of items, where you may need to pass the item’s ID, name, or other properties.
2. Passing Event and Additional Arguments
If you need access to the event object along with other parameters, you can explicitly pass it.
3. Updating State with Different Values
If you’re using React, this will be very helpful when updating state based on specific values.
4. Toggling Different Actions
AD
When a single function needs to handle multiple actions based on the button clicked.
How to Pass Multiple Parameters in JavaScript onClick Function?
1. Using an Arrow Function in Event Listener (Recommended)
<button id="myButton">Click Me</button>

<script>
  function handleClick(param1, param2, param3) {
    console.log(param1, param2, param3);
  }

  document.getElementById("myButton").addEventListener("click", () => {
    handleClick(1, 'Hello', true);
  });
</script>
If you want to keep your JavaScript file separate from the HTML, this is the recommended method for passing multiple parameters in the onclick function.
To use this method, first add an id or class to the HTML button elements so you can easily access them in the JavaScript section.
Now, define a function with multiple parameters and use them as needed. For example, I have logged all three parameters—”para1,” “para2,” and “para3″—to the console.
function myFunction(para1, para2, para3) {
    console.log(para1, para2, para3);
}
Now, select the button element using getElementById or querySelector, then add an event listener with the type set to “click.” I will also pass the function with parameters inside the addEventListener method.
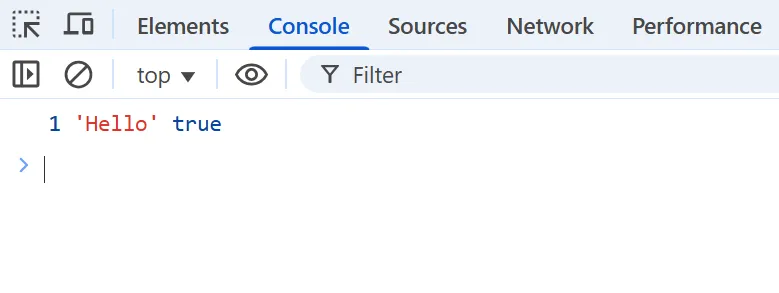
When I click the button, all three parameters will be displayed in the console, just as I coded them.

2. Using an Arrow Function
<button onclick="handleClick(1, 'Hello', true)">Click Me</button>

<script>
  function handleClick(param1, param2, param3) {
    console.log(param1, param2, param3);
  }
</script>
AD
If you’re looking for a method that allows you to use the onclick attribute, then the second method is the best option for you.
First, create a regular function with multiple parameters. In this example, I’m adding three parameters for the demonstration.
Now, use the parameters inside the function. In this example, I have logged all three parameters—”para1,” “para2,” and “para3″—to the console.
Now, add the function to the button using the onClick attribute and pass the three parameters to it.
Also see: JavaScript Push Object to Array (5 Simple Methods)
<button onclick="myFunction('para1', 'para2', 'para3')">Click Me</button>If I click the button now, all three parameters will be displayed in the console.

3. Using .bind() Method
<button id="myButton">Click Me</button>

<script>
  function handleClick(param1, param2, param3) {
    console.log(param1, param2, param3);
  }

  document.getElementById("myButton").addEventListener("click", handleClick.bind(null, 1, 'Hello', true));
</script>
The third method ensures that the function executes with predefined arguments when the event is triggered.
This code binds multiple parameters to the handleClick function using .bind().
The <button> has an id="myButton".
handleClick logs three parameters when called.
.bind(null, 1, 'Hello', true) pre-sets arguments (1, “Hello”, true) so when the button is clicked, handleClick runs with those values.
4. Using an Event Object with Parameters
<button id="myButton">Click Me</button>

<script>
  function handleClick(event, param1, param2) {
    console.log(event.type, param1, param2);
  }

  document.getElementById("myButton").addEventListener("click", (event) => {
    handleClick(event, "Hello", "World");
  });
</script>
If you want to access the event object in the parameters, this method is useful because it allows you to access the event object along with other parameters.
Keep the code the same as in Method 1; the only change I’ve made here is passing the "event" keyword as a parameter to access the event object.
If I log all the parameters, I can see that I have access to both the event object and the other parameters.
Conclusion
If you want to keep your JavaScript code separate, use Method 1 (Arrow Function in Event Listener). However, if you prefer a simpler approach, you can use a direct arrow function. Additionally, you can access the event object by passing event as a parameter, as demonstrated in Method 4.
Let me know which method works for you, and if you have any suggestions or a better approach, feel free to share them in the comments section.
I hope you now understand how to pass multiple parameters in an onClick function in JavaScript. You might also be interested in, How to Call a JavaScript Function on Button Click in HTML? (5 Simple Methods), How to Take User Input in JavaScript Without Prompt? (4 Simple Methods) or How to Call a Function After setTimeout in JavaScript? (5 Simple Methods).
If you enjoyed this blog post, subscribe to our SingleSyntax YouTube channel for amazing web development tips and coding tutorials!
